I’m really excited about how blockchain technology is reshaping industries by providing decentralized and secure solutions. Among the many blockchain platforms out there, Aptos stands out with its innovative approach and solid infrastructure. In this article, I’ll focus specifically on Aptos. From what I’ve learned, Aptos is designed to offer a scalable and user-friendly environment for both developers and businesses. Central to this technology is the Move programming language, which was developed using Rust. The move was created with a strong emphasis on safety and security, leveraging Rust’s capabilities to ensure robust smart contract development. Its unique features make it an ideal choice for building secure and efficient blockchain applications.
Introduction
In this article, we will explore the fundamentals of Aptos and provide a step-by-step guide to writing and deploying your first smart contract using the Move language. By the end of this guide, you’ll be well-equipped to start developing on Aptos and leveraging the power of Move for your blockchain projects.
Prerequisites
In order for me to help readers(you) learn the Move language through this article, it’s beneficial to you if you have some foundational knowledge and understanding of certain concepts. Therefore, here are some prerequisites I think you know:
Basic Programming Knowledge: You should have a fundamental understanding of programming concepts such as variables, control flow, and functions. Knowledge of programming in languages like Python, JavaScript, or C++ can be helpful.
Understanding of Blockchain Basics: Having a basic grasp of blockchain technology and concepts such as decentralized networks, smart contracts, and cryptocurrency is important.
Familiarity with Smart Contracts: Since Move is used for writing smart contracts, familiarity with what smart contracts are and how they work can be beneficial.
Knowledge of Type Systems: Understanding basic type systems and data structures will aid readers in grasping Move’s type system and resource-oriented programming approach.
Aptos Ecosystem
The Aptos blockchain is designed as a next-generation Layer 1 blockchain, aimed at providing a secure, scalable, and upgradeable infrastructure for decentralized applications (dApps) in the Web3 era. It has been developed by Aptos Labs, which was founded by former Meta employees who worked on the Diem blockchain project. The main goals of the Aptos blockchain are to address the limitations of existing blockchains, such as frequent outages, high costs, low throughput limits, and security concerns.
Key Features of the Aptos Ecosystem:
Security and Reliability: The Aptos blockchain emphasizes security, reliability, and safety as its core principles, ensuring that developers can build secure applications that are resistant to malicious attacks.
Scalability: The Aptos blockchain employs a modular and pipelined approach to transaction processing, enabling high throughput and low latency. This approach includes parallel transaction execution and batch storage, which leverages all available physical resources for improved hardware efficiency.
Upgradeability: Aptos supports frequent and instant upgrades through its modular architecture and embedded on-chain change management protocols. This allows the network to rapidly integrate new technologies and support evolving Web3 use cases.
Decentralization: Aptos is designed to support decentralized application development, providing a trustworthy platform for building and deploying dApps.
High Throughput and Low Latency: The blockchain can process a high number of transactions per second (up to 160,000 tps), with less than a second time-to-finality, significantly boosting transaction speeds and reducing costs.
Flexible Key Management: The Aptos data model enables flexible key management and hybrid custodial options, enhancing security and providing a safer user experience.
Move Programming Language
Move is the native programming language of the Aptos blockchain, developed to enhance the performance, safety, and security of smart contracts. It was initially created for the Diem project but has since been adapted and integrated into the Aptos ecosystem.
Key Features of the Move Programming Language:
Resource-Oriented Programming: Move introduces the concept of resource-oriented programming, where resources are first-class citizens. This means that assets cannot be copied or discarded, only moved, which helps prevent double-spending and other forms of fraud.
Formal Verification: Move supports formal verification through the Move Prover, a tool that verifies the correctness of smart contracts. This ensures that the contracts behave as intended and meet specified safety properties, providing additional safeguards against vulnerabilities.
Flexibility and Efficiency: Move allows developers to define custom resources and modules, providing flexibility in how they handle assets and state changes. This makes the language efficient for writing secure and performant smart contracts.
Transaction Safety: Move ensures transaction safety and atomicity, supporting complex transactions without requiring upfront knowledge of the data to be read and written. This feature enables higher throughput and simplifies the development process.
The combination of the Aptos blockchain’s robust infrastructure and the Move programming language’s advanced features creates a powerful ecosystem for developing secure, scalable, and efficient decentralized applications.
Setting Up Development Environment
Great! Since I’ll taken through some of Apto's core features on Ecosystem, the next thing is to set your development environment. I’m currently using Windows, but if you’re on Mac or Linux you can still follow this setup after checking on the implementation of each OS.
CLI installation
If you’re using Windows and want to install the Aptos CLI tool, I’ve found that the easiest method is through a Python script. This approach is straightforward and typically works well. However, if you run into any issues with the Python script, there’s an alternative way to install the tool manually using pre-compiled binaries.
That said, I usually don’t recommend the pre-compiled binaries method. The main reason is that updating the CLI tool with this approach can be quite cumbersome and manual. So, unless you have a specific reason to use the binaries, sticking with the Python script is generally the smoother path.
Install Using a Python Script
To get started, first head over to python.org. Once you’re there, hover over the “Downloads” button in the navigation bar and click on “Windows.”
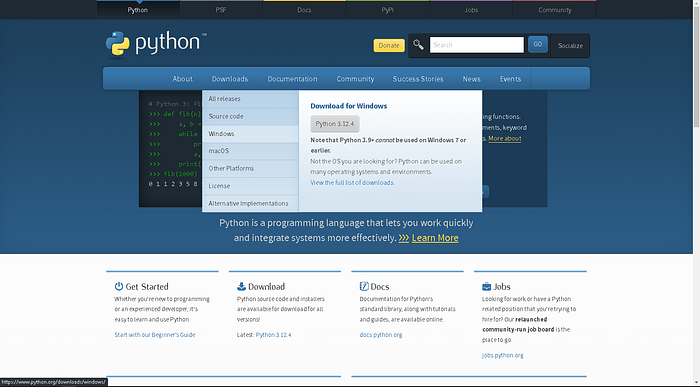
After selecting your operating system (in my case, Windows), you’ll be redirected to the download page for Python. Here, you’ll need to download a Python package that’s version 3.0.0 or higher. However, be sure to note the warning: if you’re using Windows 7 or earlier, Python versions 3.9 and above won’t work.
Aptos requires that you install the python3.6+ version on your OS.So search for the Python 3.6.2 stable release from July 17, 2017, if you cannot find it, here is a link to it. You’ll be taken to a page where you need to choose your installation medium. Scroll down to the “Files” section and select the medium that suits your setup. For me, that’s the “Windows x86–64 executable installer (64-bit).”
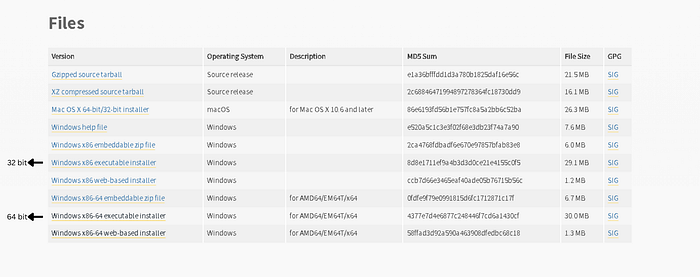
Once the download is complete, you should find the Python installer executable in your Downloads folder. Run the setup file, and make sure to check the options that appear. Then, click on “Customize installation.”
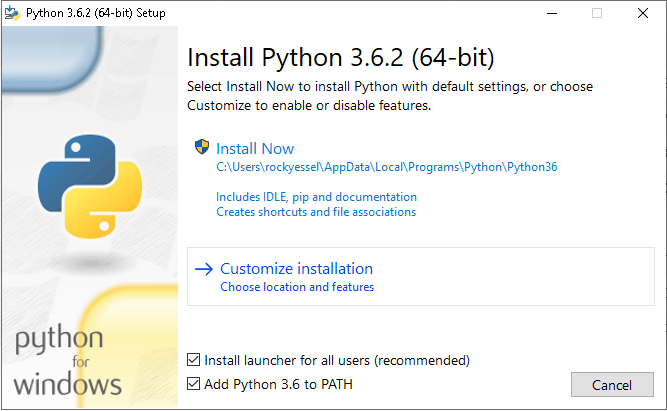
Now select the features you need to install. Select all if required.
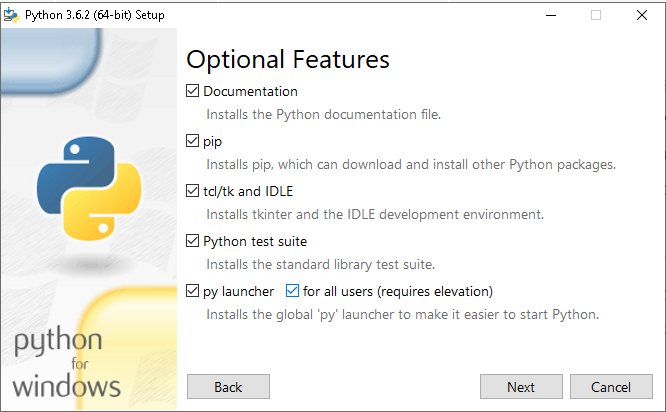
Now select the advanced options as per your requirements. You can select all and click Install.
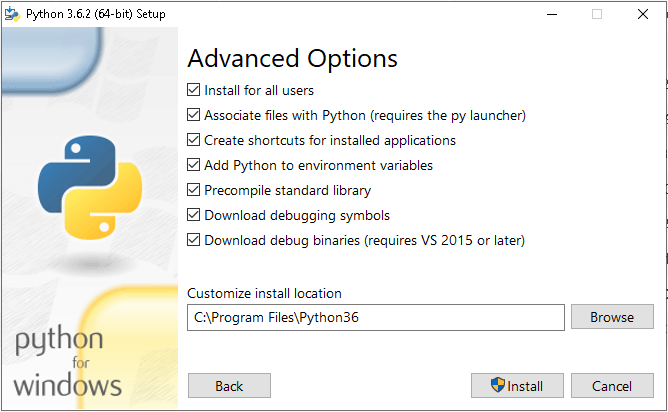
Click Install, and after the installation, you will see a successful installation message like below.
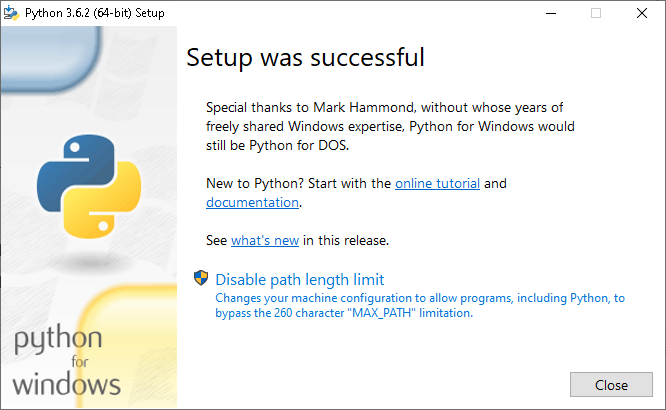
Great! you now have installed Python 3 on your OS, and now verify Python installation. Open your Powershell terminal and run the command below:
python3 --version
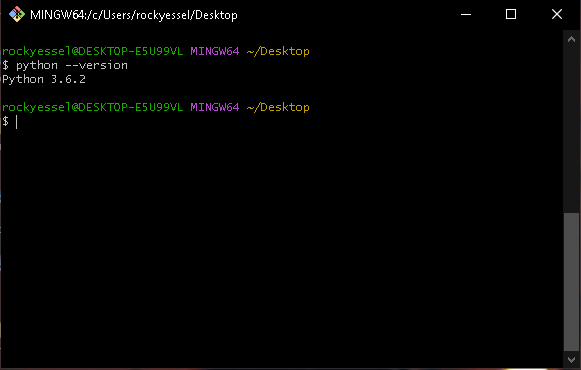
From Aptos docs, they’d provide you with the command below to install Aptos CLI on your OS.
iwr "https://aptos.dev/scripts/install_cli.py" -useb | Select-Object -ExpandProperty Content | python3
But it didn’t work out for me, so instead of running the above script directly from the URL, you download it to your local machine first, with this command
Invoke-WebRequest -Uri "https://aptos.dev/scripts/install_cli.py" -OutFile "install_cli.py"
After downloading, run the script locally with Python
python install_cli.py
Your outcome should match mine below:
PS C:\Windows\system32> python install_cli.py
Latest CLI release: 3.5.0
Currently installed CLI: None
Installing 3.5.0
Determined target to be: Windows-x86_64
Welcome to the Aptos CLI installer!
This will download and install the latest version of the Aptos CLI at this location:
C:\Users\rockyessel\.aptoscli\bin
Installing Aptos CLI (3.5.0): Downloading...
Installing Aptos CLI (3.5.0): Done!
The Aptos CLI (3.5.0) is installed now. Great!
You can test that everything is set up by executing this command:
aptos.exe info
Now after installing the Aptos CLI successfully, the next step optional though, is to delete the install_cli.py, the script is only needed for the installation process and does not affect the functionality of the installed Aptos CLI.
Remove-Item "C:\Users\rockyessel\install_cli.py"
Verify Aptos CLI Installation:
aptos help
By running the command above, you are just ensuring that you did install Aptos CLI correctly and that it's functioning correctly after deleting the script. And your outcome should be like this below:
PS C:\Users\rockyessel> aptos help
Command Line Interface (CLI) for developing and interacting with the Aptos blockchain
Usage: aptos.exe <COMMAND>
Commands:
  account     Tool for interacting with accounts
  config      Tool for interacting with configuration of the Aptos CLI tool
  genesis     Tool for setting up an Aptos chain Genesis transaction
  governance  Tool for on-chain governance
  info        Show build information about the CLI
  init        Tool to initialize current directory for the aptos tool
  key         Tool for generating, inspecting, and interacting with keys
  move        Tool for Move smart contract related operations
  multisig    Tool for interacting with multisig accounts
  node        Tool for operations related to nodes
  stake       Tool for manipulating stake and stake pools
  update      Update the CLI or other tools it depends on
  help        Print this message or the help of the given subcommand(s)
Options:
  -h, --help     Print help
  -V, --version  Print version
Great! Now you know you’re way around installing your Aptos CLI.
Projects Overviews
Now, you’re going to create three projects, and it is important I mention that the one project is more of a basic project from the Aptos doc. The whole point of building this as your first project, is to get you familiar with Aptos’s environment from development to deployment using the CLI, later on other project, there would be a more in-depth guide and explanation. So let’s begin.
Now let’s head into creating your smart contract. Create a directory called move_aptos_1, there you create another directory called sources, and that's where your code will be, then create a toml file called Move.toml.
Inside your toml file, paste the code below:
[package]
name = "move_aptos_1"
version = "1.0.0"
authors = []

[addresses]
hello_move_aptos = "_"

[dependencies]
AptosFramework = { git = "https://github.com/aptos-labs/aptos-core.git", rev = "mainnet", subdir = "aptos-move/framework/aptos-framework" }

[dev-dependencies]
The Move.toml file is a configuration file for your Move project. It helps manage the project's dependencies and settings, making development and deployment smoother.
Inside your sources directory, create a file and call it hello_aptos_network.move, and paste the code below
move_aptos_1/sources/hello_aptos_network.move:
module hello_aptos_network::message {
    use std::error;
    use std::signer;
    use std::string;
    use aptos_framework::event;

//:!:>resource
    struct MessageHolder has key {
        message: string::String,
    }
    //<:!:resource
    #[event]
    struct MessageChange has drop, store {
        account: address,
        from_message: string::String,
        to_message: string::String,
    }
    /// There is no message present
    const ENO_MESSAGE: u64 = 0;
    #[view]
    public fun get_message(addr: address): string::String acquires MessageHolder {
        assert!(exists<MessageHolder>(addr), error::not_found(ENO_MESSAGE));
        borrow_global<MessageHolder>(addr).message
    }
    public entry fun set_message(account: signer, message: string::String)
    acquires MessageHolder {
        let account_addr = signer::address_of(&account);
        if (!exists<MessageHolder>(account_addr)) {
            move_to(&account, MessageHolder {
                message,
            })
        } else {
            let old_message_holder = borrow_global_mut<MessageHolder>(account_addr);
            let from_message = old_message_holder.message;
            event::emit(MessageChange {
                account: account_addr,
                from_message,
                to_message: copy message,
            });
            old_message_holder.message = message;
        }
    }
    #[test(account = @0x1)]
    public entry fun sender_can_set_message(account: signer) acquires MessageHolder {
        let addr = signer::address_of(&account);
        aptos_framework::account::create_account_for_test(addr);
        set_message(account, string::utf8(b"Hello, Aptos Network"));
        assert!(
            get_message(addr) == string::utf8(b"Hello, Aptos Network"),
            ENO_MESSAGE
        );
    }
}
As I mentioned, the focus isn’t the code itself, but I think it would be better to still explain both in a non-technical term and a technical term.
So think of the above code as a digital message board where users can leave and update messages, but in this instance, only one user can set the message and others can view it. Imagine a company where a manager can set a message on a board for other employees to see and get notified about the current situation of the company or team. The code provides a way for a user to set a new message for other users to check what message is currently posted. If a user tries to check their message but hasn’t set one yet, the system will notify them that there is no message available. Whenever a message is updated, the system logs the change so that you can track what the previous message was and what the new one was.
For a more technical explanation, this Move module, hello_aptos_network::message, defines a simple messaging system on the Aptos blockchain. It includes a resource MessageHolder that stores a message string for each account address. The module provides two primary functions: get_message, which retrieves the current message for a given address and ensures that the address has a message stored, and set_message, which allows an account to set or update its message. If the message holder does not exist for an address, it creates one; if it does exist, it updates the message and emits a MessageChange event to record the change. Additionally, the module includes a test function to verify that the messaging functions work correctly by creating a test account, setting a message, and checking if the message was set properly.
Deploying Your First Smart Contract(Module)
In the next project, I’ll go into more technical details about the project we’ll be building. So, to deploy your module on the Aptos network, go to your terminal and run the command below to initialize a new local account:
aptos init
You will see the output asking to choose a network:
Choose network from [devnet, testnet, mainnet, local, custom | defaults to devnet]
At this point, I chose testnet, so I recommend you do the same. Next, you’ll be asked to provide a private key, you can press enter to have aptos create one for you, alongside your address, but I think you would want you have your wallet address as your local address on your machine just to make things easier. So let’s create your Aptos wallet address.
I recommend Petra Wallet by Aptos, but for developers who prefer Firefox use Nightly Wallet which also supports Aptos.
To get the private key from the wallet above do this:
Petra: Settings -> Manage Account -> Enter Password -> Copy Private Key
Nightly Wallet -> Click on the left Bar -> Settings -> Security -> Show private key -> Password -> Copy Private key
After copying your private key, paste it in the terminal asking for your private, that way you can use your wallet locally on your machine, and in the browser. You should see a similar outcome to mine:
Aptos CLI is now set up for account 0x61de4a4c20f1f51d9deb5caaa47646f99776660419334c70df6d848d4d4c173a as profile default!
 See the account here: https://explorer.aptoslabs.com/account/0x61de4a4c20f1f51d9deb5caaa47646f99776660419334c70df6d848d4d4c173a?network=testnet
 Run `aptos --help` for more information about commands
{
  "Result": "Success"
}
PS C:\Users\rockyessel>
Now head over to the Move.toml file, and let's talk a little about the [addresses] section:
[package]
name = "move_aptos_1"
version = "1.0.0"
authors = []

[addresses]
hello_aptos_network = "0x61de4a4c20f1f51d9deb5caaa47646f99776660419334c70df6d848d4d4c173a"

[dependencies]
AptosFramework = { git = "https://github.com/aptos-labs/aptos-core.git", rev = "mainnet", subdir = "aptos-move/framework/aptos-framework" }

[dev-dependencies]
By comparing both the first file and this one you realize that I enter my address there, right? Well, named addresses in Move are similar to function parameters waiting for arguments. When compiling Move code, you often need to specify which named addresses our code will use. Previously, this was done directly on the command line during compilation, where we manually set the values for these addresses.
With the new Move package system, we can declare named addresses directly within our package configuration file, known as Move.toml. Think of it as setting default values for function parameters in advance (like how you'd pass props to React components with default values in case data is not provided for the props). This allows us to declare a named address in our package file and either leave it unassigned (which means it's flexible and can be set to any valid address by whoever imports the package) or assign it a specific value (making it fixed and known).
For example, in your first Move.toml file you copied, you had declared a named address like this:
[addresses]
hello_aptos_network = "_"
This notation means that the hello_aptos_network address can be any valid address, and whoever imports this package can set it to their desired address. Alternatively, if we declare:
[addresses]
hello_aptos_network = "0x61de4a4c20f1f51d9deb5caaa47646f99776660419334c70df6d848d4d4c173a"
we’re specifying that the address must be exactly 0x61de4a4c20f1f51d9deb5caaa47646f99776660419334c70df6d848d4d4c173a, leaving no room for modification.
These declarations influence how address values flow within the package graph. With unassigned addresses, the value is provided by the importing package, akin to passing an argument to a function. With assigned addresses, the value is set in the declaration and flows upwards, defining the address for all packages using it. This system simplifies managing named addresses across packages, much like how default arguments streamline function calls in programming.
To make things easier, I’ll explicitly assign an address to them, hello_aptos_networkand remember to replace your address with mine. With that explanation out of the way, now it's time to compile and publish your contract on the Aptos network and interact with it.
Compiling your contract doesn’t charge you any fee, but publishing it does, so run the command below to fund your address.
aptos account fund-with-faucet --account default
You should see an outcome similar to mine:
PS C:\Users\rockyessel> aptos account fund-with-faucet --account default
{
  "Result": "Added 100000000 Octas to account 0x61de4a4c20f1f51d9deb5caaa47646f99776660419334c70df6d848d4d4c173a"
}
PS C:\Users\rockyessel>
So check your wallet on your browser extension:
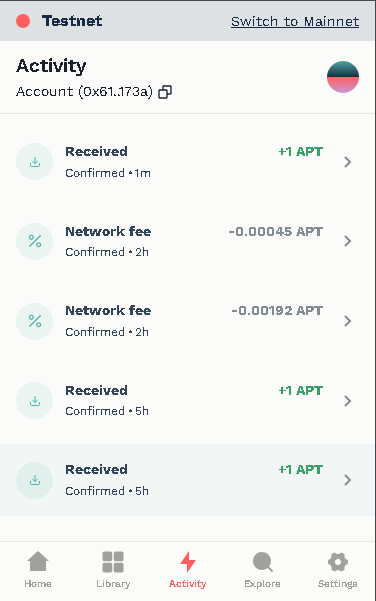
If everything works, then you’re good to go, but if it isn’t well, you’re a developer, figure it out😘.
First, let’s compile this contract by running the command below:
aptos move compile
This should be a similar outcome to the following:
PS C:\Users\rockyessel\Desktop\move_aptos_1> aptos move compile
Compiling, may take a little while to download git dependencies...
UPDATING GIT DEPENDENCY https://github.com/aptos-labs/aptos-core.git
INCLUDING DEPENDENCY AptosFramework
INCLUDING DEPENDENCY AptosStdlib
INCLUDING DEPENDENCY MoveStdlib
BUILDING move_aptos_1
{
  "Result": [
    "61de4a4c20f1f51d9deb5caaa47646f99776660419334c70df6d848d4d4c173a::message"
  ]
}
After this runs successfully, you should see build directory in your parent directory move_aptos_1, now, when you compile a Move smart contract, a build directory is generated as part of the compilation process. In the build directory contains several important files and artefacts such as bytecode, ABI descriptions, configuration files, and logs, that are essential for deploying and interacting with your smart contract on the Aptos blockchain.
Finally, the last step is to publish or deploy your contract on the Aptos testnet, so run the command below to start the deployment:
aptos move publish
After it runs successfully, you should see a similar output to mine,but you’d be asked a question about paying your transactional fee, just type y or yes, to continue, and BOOM! You've deployed your contract on Aptos, now click on the transaction link.
PS C:\Users\rockyessel\Desktop\move_aptos_1> aptos move publish
Compiling, may take a little while to download git dependencies...
UPDATING GIT DEPENDENCY https://github.com/aptos-labs/aptos-core.git
INCLUDING DEPENDENCY AptosFramework
INCLUDING DEPENDENCY AptosStdlib
INCLUDING DEPENDENCY MoveStdlib
BUILDING move_aptos_1

package size 2537 bytes
Do you want to submit a transaction for a range of [7100 - 10600] Octas at a gas unit price of 100 Octas? [yes/no] >
y
Transaction submitted: https://explorer.aptoslabs.com/txn/0xbdf5680310a52560865e3751f08ba94cec1dcdbcd487ca81d41061681071b499?network=testnet
{
  "Result": {
    "transaction_hash": "0xbdf5680310a52560865e3751f08ba94cec1dcdbcd487ca81d41061681071b499",
    "gas_used": 71,
    "gas_unit_price": 100,
    "sender": "61de4a4c20f1f51d9deb5caaa47646f99776660419334c70df6d848d4d4c173a",
    "sequence_number": 2,
    "success": true,
    "timestamp_us": 1721687225983436,
    "version": 5512659680,
    "vm_status": "Executed successfully"
  }
}
PS C:\Users\rockyessel\Desktop\move_aptos_1>
Interacting with your deployed contract
In this video, I’ll be demonstrating how to interact with the deployment. At the time of writing this article, my laptop is damaged, and I’m currently working on a friend’s machine. Unfortunately, this machine also has issues with Bluetooth and cable headsets, so there’s no sound. I apologize for any inconvenience this may cause, but I’ll do my best to provide a clear explanation here.
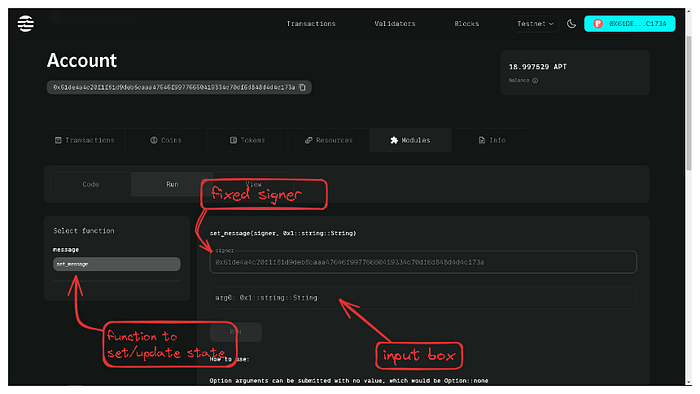
This image above, is a user interface for interacting with an Aptos blockchain account, displaying the account address and balance. The interface includes tabs for viewing Transactions, Coins, Tokens, Resources, Modules, and additional account Info.
A function selector displays a list of executable functions the users are allowed to choose, but this is the case we have "set_message" selected in this instance. The centre section details the function signature, indicating it takes a signer and a String parameter, remember we made the signer fixed signer address matching the account address. An input box is provided for entering the message string, and a Run button at the bottom executes the function. This setup is typically used by developers or users managing their blockchain accounts, executing transactions, and interacting with smart contracts.
Conclusion
You’ve done an outstanding job reaching this point! With a solid grasp of Aptos development and deployment, you’re well-prepared to tackle your next project. I hope the information provided has given you a strong foundation and boosted your confidence in the development process. Follow me on X @rockyessel Rocky Essel, I’ll be sure to continue to article.